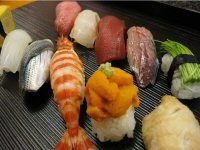
Nigiri-zushi
 Nigiri-zushi
Serves: to serve 4
Prep Time: 20 Minutes
Ready In: 20 mins
ingredients
4 cups -
cold Japanese Sushi Rice
6 oz - tuna
6 oz - halibut
6 oz - red snapper
6 oz - mackerel
8 - prawns
- pickled ginger
2 teaspoons - wasabi paste
- dark soy sauce
6 oz - tuna
6 oz - halibut
6 oz - red snapper
6 oz - mackerel
8 - prawns
- pickled ginger
2 teaspoons - wasabi paste
- dark soy sauce
directions
- The basis is the same for all nigri. You form the rice into a slightly rounded shape and join a thin slice of raw fish or a cooked prawn (split down the middle) to it. The diagrams below should help..
1 
- Moisten your hands with 'Te-zu'
- Take about one ounce (25 g) of Sushi Rice in your right hand and make an egg-shaped rice ball in your palm.
- Pick up a piece of sliced fish with thumb and index finger of your other hand.
Te-zu (hand-vinegar) is prepared by diluting rice vinegar with water by about 1:3.
Preferably the temperatures of Sushi Rice (Shari) and your hands should be the same. Shari tends to stick to cold hands.2 
- Holding the shaped Sushi Rice, scoop up a tiny amount of wasabi with the right index finger.
- Rest the fish between the second and third joints of your left hand fingers.
3 
- Smear the wasabi on the centre of the fish.
No need to spread the Wasabi, otherwise it can prevent good cohesion between the fish and the rice. 4 
- Place the rice onto the fish.
- Gently press the centre of the rice with the thumb to introduce some air into the rice.
'Airing' the rice is the most important part of making good nigiri-zushi. 5 
- Hold and close the nigiri by the four fingers of your left hand and press with two fingers of your right hand.
- Push down the end of the nigiri with the left thumb at the same time.
Do not press too hard - just enough for the fish to adhere to the rice. 6 
- Turn your right hand round to show your palm.
7 
- Transfer the sushi (nigiri) from your left palm over to your right.
8 - By turning each hand again in reverse, return the nigiri to left palm. Now it has been rotated horizontally by 180°.
- Again press and push as in step 5
The other end is now made firm by the thumb. 9 
- By rolling the nigiri (either with a help of your right index finger, or simply rolling it in your palm) turn it so it has the fish side up.
10 
- Again press and push the same way as before.
Do not press too much. The critical point is that the outside of the nigiri is firm enough but inside is still loose. 11 
- Pick up the nigiri and rotate horizontally by 180°.
- Again press and push in the same way.
- Repeat this once or twice more.
12 
- Make any final adjustments on both sides, if necessary, then press one last time.
Nigiri of 'Funazoko' (ship-bottom) shape is now complete. - The more Nigiri-zushi you make, the more expert you will become at shaping them. Carefully arrange them on a plate (or plates), along with a few slices of pickled ginger. In a small dipping bowl, pour a little soy sauce - about ½" (1cm) depth - and serve next to each plate.